(This is going to get technical. Fast.)
I’m a big fan of deferred rendering as you might have gathered from my GDC 09 talk. So it made sense that for Frameranger, and subsequent projects, I moved my demo engine over from what was essentially a forward renderer to a complete deferred renderer. I wanted to share some of the experience here. There are some good introductions to deferred rendering out there, like this one, which cover the basics so I don’t have to.
Note, I’m working on DX9 – DX10 wasn’t an option at the time of development (and still isn’t, really, until the supporting OSes take the vast majority of the market) – so that adjusts my available feature set. No depth buffer reads, no hardware MSAA.
So, why go deferred?
- Only need one geometry pass for the main render. Previously we usually needed a z prepass for performance, and sometimes even another separate pass for motion blur velocities and for depths for SSAO and other effects. For some of the stuff we had to render which was very high poly or had a lot of draw calls, or where it wasn’t polygons at all, only having to do them once is important. (Shadows still always cost extra, though.)
- Separate rasterisation and shading. Not having to worry about lighting and so on at the geometry stage means that the geometry stage becomes simple, and most geometry shares one shader – we don’t need so many combinations of ubershader anymore. Combined with the reduced number of geometry passes it means we can reduce our batch count, amount of state changes and number of shaders we have to generate by a lot.
- Lighting as a 2D post process. Apply as many lights as you want, efficiently, and without having to build many uber shader combinations. As many lights as we want, as many types of lights as we want, mixing shadowed and unshadowed, potentially handling 1000s of lights.
- Spatially optimise lighting and complex shading. Only apply light to the pixels which are actually in the light’s area of effect.
- Only shade pixels with complex lighting shaders once (per light) – less issues with overdraw from geometry rendering.
- Use the additional GBuffer information to do some more interesting post fx and rendering.
So there were a lot of things we wanted a piece of. Unfortunately there are some major downsides too, which is why I hadn’t gone down this road before:
- No hardware antialiasing (on DX9). For me this had been the killer up to now. I don’t like unantialised renders. This time around though the benefits were so big that I decided to just screw it and worry about antialiasing later.
- Overhead of memory use – we need to store those fat-ass GBuffers somewhere – and rendering. It smooths out the render performance with all the pretty fixed overheads – which makes the complex cases faster (or work at all), but the simple cases are potentially a lot slower. I decided our general case is complex enough not to care about the simple cases.
- Potentially reduced material flexibility. We can’t just hack a shader which computes some lighting and messes with the equations for that one material – we have to do everything en-masse in 2D processes.
- Alpha stuff still has to be handled in a second, forward rendered pass. Which means we still need a working forward renderer.
So, I managed to sufficiently minimise in my head how much I cared about the downsides and just crack on and implement the deferred renderer to see what happened. It was actually very easy to do – a day or two’s work had the whole thing up and running with multiple types of light working. Then there were weeks or months of work in adding all the interesting stuff on top.
The first task was to get the geometry rendered to GBuffers. When rendering the GBuffers it’s important to minimise the number of channels and the bit depth required – the greater it is, the more memory and slower the render is. You also have to consider how you want to read the data – you probably don’t need the colour info until late in the day, whereas the normals are needed a lot – so don’t pack something you need a lot with the colours, because it’ll be a wasted additional GBuffer read.
I used 3 or 4 MRTs for my GBuffer rendering, depending on whether or not motion blur was enabled, where each MRT was 32 bits wide. The channels I rendered to GBuffers were:
Colour+ObjectIndex : RGBA8888;
Normal+MaterialIndex : RGBA8888;
Depth : Float32
VelocityBuffer (optional – only if motion blur enabled) : RG Float16
and of course a D24S8 depthstencil. Which I cant read from, because DX9 doesnt allow it. How annoying. If I could I could skip that float32 depth, like I would on PS3. But I can’t. Damnit. Actually it works on ATI, so it’s just NVIDIA that’s the problem. Dear NVIDIA: you guys managed to hack in almost every other feature under the sun using 4CCs and other tricks, so how about adding depth buffer value reads for DX9, and multisampled buffer reads while you’re there? Go on – I bet it’s there in the drivers already, and I just don’t know what the magic incantation is to access it.
One thing that comes up a lot when discussing deferred renderers is the storage of normals. Nearaz has a really good summary / investigation of the different methods. I’m lazy, so initially I just wrote out the normal as an XYZ, deciding that if I ever needed an extra GBuffer channel I’d fix it and use XY in a compacted form and recreate Z. So far I didn’t.
Next I added the basic light types. It’s pretty easy to move the lighting code over from a forward render – it just needed the extra code to pull the values out of the GBuffers and back project to recreate positions, rather than pull everything out of the vertex interpolators.
Spot lights were trivial, of course. A single projected shadow map did the job. Point lights proved annoying because of another D3D limitation – I couldn’t create a depth stencil cubemap, and I wanted to render to a depth stencil for efficiency on render and for free hardware PCF – so I ended up making a “virtual cube map” which spread the faces out on a 2D texture. Finally, for directional lights I implemented a varying number of cascaded shadow maps. Directionals proved to be by far the most used light type, and I put some work into making it calculate a good set of shadows for the splits.
The nice trick with a deferred renderer is that I can apply the splits separately to the screen in 2D, rather than sampling all of them per pixel. I first render a series of view-aligned planes at the depth of each split, front to back, into the depth+stencil, marking the stencil where they pass the depth test. This gives me a series of stencil masks that I can use to test against when rendering full screen quads, one per split, which sample just that one split’s shadow map each.
The initial work of adding the lighting was quite easy, but it instantly proved the benefits of deferred shading. Previously, just adding a new type of light, changing lighting code or adding more influencing lights cost work – a new shader code path which had to be propogated through the ubershaders – increasing the compile time every time – and then into the code to select the ubershaders. There was a hard limit on the complexity of each light and the number of lights, because of the hard limit on the size of shaders and, more pressingly, the number of textures that could be used at once. But now it was simply a case of adding another 2D pass, and a single piece of shader code which could be edited and reloaded over and over again easily. I had never bothered to add all the different light types or cascading shadow map support to my forward renderer because it required too many permutations and too many simultaneous textures, but now I had it all working easily, and finally could handle shadows well from massive scenes with directional lights. Adding deferred rendering had already paid off.
Now, what about those classic problems with deferred rendering?
Flexibility
The next issue was that of flexibility – how to get materials that look different to each other. With forward renders it’s easy – you just make a different shader for the material, and change the behaviour of that material. But with deferred renderers it doesn’t work like that – everything is done in a series of 2D passes on the whole screen. So, you have to render extra information into the GBuffers which tell those passes how to produce the correct behaviour for each pixel. Unfortunately GBuffers get fat fast if you add a lot of parameters. Most of our parameters varied per material, so I simply created a material palette as I was rendering the objects of all the unique materials, and wrote two indices to the GBuffers – the object index, and the material index. Both limited to 256 indices (lists updated per frame). Bad news? Well, if we had that many draw calls we’d be screwed performance-wise anyway, so a 256 material+object limit didn’t matter.
As development continued, the data in our material palette grew and grew. By the end it was several textures worth – with data for fresnel coefficients, how to apply envmaps, various light equation constant modifiers, and so on. It enabled us to easily adjust the material parameters without adding a lot to our GBuffers. I’ve heard it said that this doesn’t work – because you want to vary a lot per pixel, like specular gloss, specular power, and so on, and this doesn’t allow it. I’ve also heard that you need lots of different shaders to get a good look. Well, it was never the case for us. Probably 90% of our geometry always went through the same default shader; we didn’t adjust that much per pixel in textures except where it was really needed – it added a lot more work to the art side as well as more space requirements.
Another useful thing about the material palette came to light later on when optimising the renderer to reduce draw call counts. The only remaining per-material parameters that were used when rendering the mesh were the textures and the material index – everything else was in the material palette. That meant that it was easy to merge meshes together and store a palette index in a vertex buffer channel I didn’t need (I used vertex colour alpha). This meant I could pack the meshes down completely except where the textures differed, but still allow on-the-fly editing of the separate material properties. In addition I could actually change the material index per pixel if I wanted – e.g. using a mask texture to select between two materials – with very little overhead. This exposed a whole new set of tricks and went some way to solving the problem of not being able to vary material properties using textures.
Besides that, where we did need something special there were a few tricks we could use when applying shading in the deferred passes. The material ID + object ID could be used to mask in whole special materials for certain objects (or parts of objects). For example, the car had a special paint shader that was masked in. Each material palette entry had a world-space bound box which was accumulated for all the objects which used it per frame; this was used to generate accurate-enough masks for 2D passes quickly and efficiently. And when it came to that extra bit of per-pixel data we needed but just didn’t have – we generated it. A simple function of the position and normal was plenty enough to sample a dirt texture or noise texture for fading reflections in and out or adjusting the bluriness. It’s a basic, hacked up form of deferred texturing, and it did the job nicely. Fortunately it’s really easy in my renderer to add extra passes and stages into the rendering pipeline, so this was something we could use a lot to customise things.
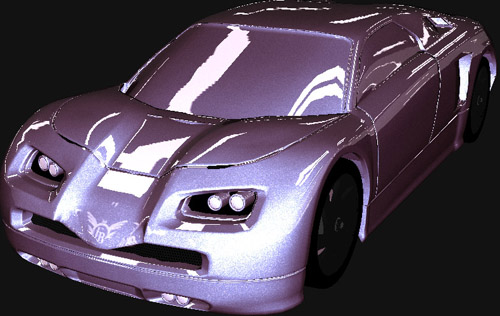
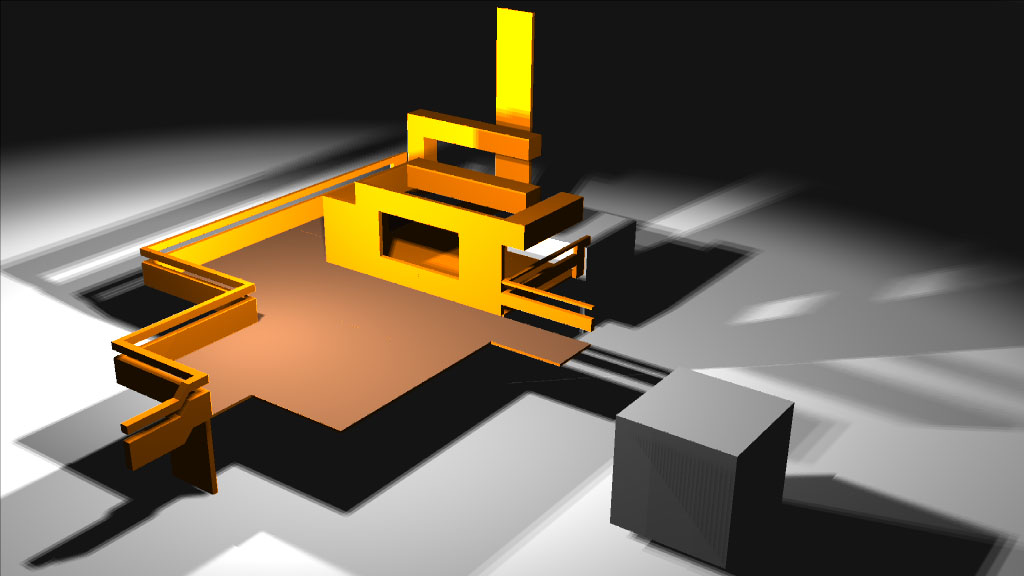
The deferred approach obviously worked great for lights. Number of lights is usually the big sell for deferred rendering. But it worked great for environment maps too. In Frameranger we had quite a lot of shiny stuff – e.g. a car and a robot – and we wanted to handle it by multiple dynamic environment maps. With the deferred render it was easy to apply. We attached dynamic envmap nodes to things so they moved around, and then attached different objects as inputs and outputs. The inputs get rendered to the envmap, and the outputs get the envmap applied to them. To apply, I generated a small dynamic 1d mask texture which mapped the object indices to white or black – so I could sample it per pixel using the object index and determine whether that object was affected by the envmap. I calculated world-space bounds for the objects which received the envmap and used that to roughly stencil in the shader, and applied the envmap additively, adjusting it using parameters from the material tables. To control fresnel reflection we wanted something better than the usual single “fresnel power” parameter. In Lightwave you can create an envelope for it and explicitly control the fresnel response over the range of the incident angle values, and I wanted something similar – so I exposed 4 control values and used a 1d bezier curve to interpolate them. Worked great – you could generate a very flexible response with it.
Non-polygonal elements
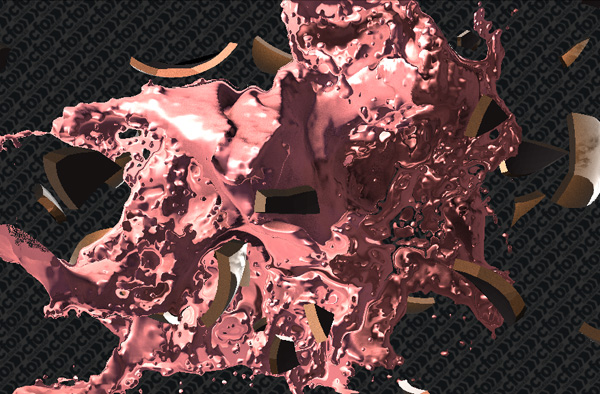
We hand to render more than just triangle-based meshes. Some of the effects – specifically the liquids / fluid dynamics – were raytraced using distance fields. Rather than write a special shading path to handle their lighting I decided to just add these into the deferred rendering pipeline and use the routines that were already in place. This had the benefit of making them interact properly with the other objects in the scene, casting shadows onto them, receiving shadows from them, working with dynamic environment maps and so on – it meant the effects looked properly part of the scene, not just floating in space separate from everything else.
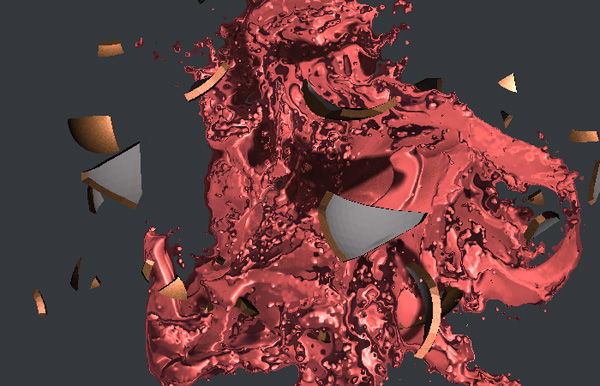
It was pretty easy to add. I raytraced the distance fields and output the results straight to the GBuffer – depth, normal, colour, etc. This also meant the ZBuffer was correct so the effects overlapped properly with the rest of the geometry. For the shadow map rendering passes I just raytraced them from the light’s point of view straight into the depth shadow map. It worked out nicely without too much effort.
Alpha stuff
Alpha stuff doesn’t like deferred rendering – sad but true. Actually I have found a way around it so you can perform deferred rendering on some alpha stuff too – I’ll get onto that in another post – but in terms of general alpha blended stuff, you’re limited to using a forward render which mimics the look of the deferred rendered geometry. Fortunately in Frameranger we didn’t have that much generic alpha mesh stuff to deal with – the particles, smoke, light beams and so on were already special cases or handled with effects in other ways – so it wasn’t a massive deal. We also avoided treating punch-through alphas or cutouts as “alpha” by using alpha testing dithered with a random noise map. As it turned out I just used my ubershadered forward rendering code for the alpha stuff like a “legacy” pass. One compromise I made was to skip shadow receiving for alpha stuff – although it would have been possible, it would have meant I’d have had to keep the shadow maps around longer than the deferred passes, whereas at present the same maps could be reused for all the lights. In reality, the only real alpha stuff we had to deal with in this way were a couple of transparent bits on the car.
Antialiasing
One of the major downsides of deferred rendering is the inability to apply standard hardware MSAA to it. On some architectures it’s possible to use MSAA when rendering the Gbuffers, but you have to do the slow bit – using the GBuffers to perform deferred rendering passes – on a per-sample basis. i.e. for 4x MSAA, you have to light 4x as many pixels and then average the results at the end. Our aim is to achieve a comparable quality of antialiasing as MSAA provides forward renderers, but with the cost of deferred rendering with unantialiased rendertargets – i.e. only lighting the number of actual pixels on screen. With deferred rendering much of the cost of rendering is pushed to the deferred, 2D passes, so it’s important to avoid incurring a large performance cost there when adding antialiasing – scaling that cost by 4 to support 4x MSAA is not feasible.
On consoles or DX10 the natural starting point is to render the geometry to MSAA GBuffers and to try and optimise the lighting process so you don’t need to light every sample. Indeed, I outlined how to optimise the process on Playstation 3 in my GDC 09 presentation. That can reduce the number of additional samples you have to light to only around 20-30% more than the number of pixels in the unantialiased buffer, which is a great improvement but still costs.
On DX9 the problem is even worse because you can’t read the individual samples from an MSAA buffer, so MSAA is completely unusable for deferred rendering there.
So, plan B then.
There are several ways to tackle antialiasing of deferred renderers. First, you could just render everything 2x or 4x the size, light it as usual, and downsample it at the very end. It looks nice – much like MSAA on a forward render, really – and it’s easy to add. But it has exactly the effect on framerate you might imagine, so it’s not a practical solution for realtime. So the usual way people try and do it is to fake it – perform a 2D post process on the result of the deferred render which somehow works out where the edges are and fixes them in a way that looks like they were rendered with antialiasing. This approach is apparently rife on xbox360 titles where the hardware’s dubious memory arrangement makes using proper MSAA on HD framebuffers problematic.
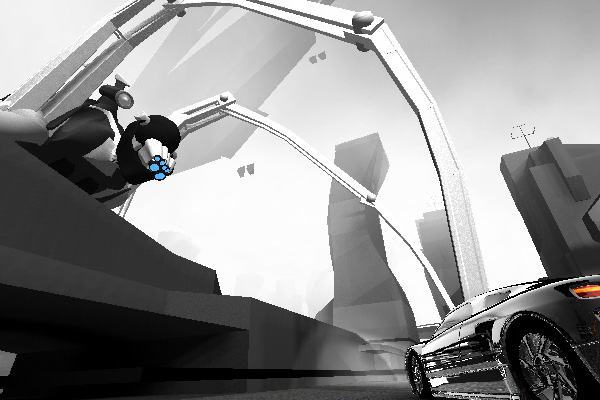
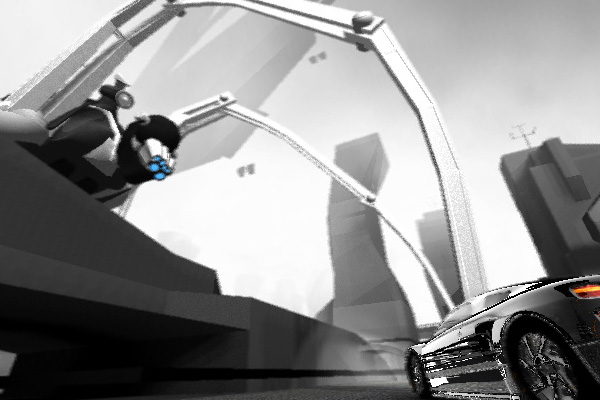
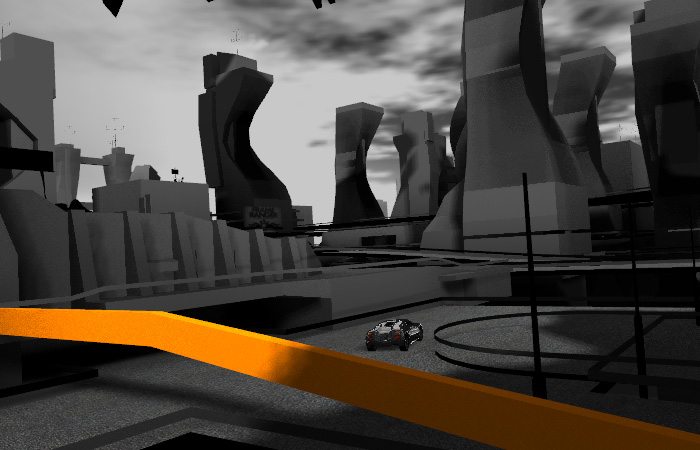
So, how would that magic post process work exactly? Step 1 – detecting edges – is easy, particularly in a deferred renderer where we have a ton of information around to help. An edge detection kernel filter applied to the depth, normal and material index/object index usually gives great results, far superior to using a colour buffer for our purposes. Step 2 – antialiasing those edges – is a little bit more difficult. It’s important to remember that what antialiasing is doing is over-sampling: generating a load of possible values and averaging them. The usual approach with post-process AA is to blur the neighbouring pixels on the edges, which is really the opposite of what we wanted. So it doesn’t really work. For Frameranger I experimented a lot and managed a reasonable attempt at it which used noise, a poisson disc and some magic weighting of the samples – and it looked marginally better than a typical edge blur – more like an “edge dither”.
Here’s some screenshots of the edge noise technique. As you can see, it doesn’t entirely look like antialiasing. Actually as an effect, adding noise to the edges, it was alright – but as antialiasing it wasn’t a good substitute. It appeared that if I wanted to achieve the look of antialiasing I was going to have to move away from using only the 2D results as input and render the geometry differently in the first place – try and gain some more information that way. By the way, all the antialias comparsion screenshots should be matched so you can download the images and diff them or toggle back and forth between them if you want to see the differences.
The second approach I used borrowed from temporal reprojection techniques, and a very old way of antialiasing in an OpenGL example. In that example, antialiasing was done by rendering the scene over and over again to an accumulation buffer and jittering the projection matrix by a sub-pixel amount each time. It’s basically stochastic sampling of the render but flipped around so that you render the screen with one stochastic offset, then again with another offset etc. and average the results at the end. When you offset the projection slightly you cause the edges of the triangles to move slightly, and you get slightly different coverage and a different set of aliasing artefacts – when you average enough of them together you get an antialiased image.
Sadly, as you might expect, rendering the scene loads of times per frame isn’t too practical for realtime. But we can take the basic idea and split it over frames – so each frame we slightly jitter the projection matrix when we render, and we blend the current frame on top of the previous frames with a low alpha value. That works great and gives you a really nice antialiased image.. as long as nothing moves. As soon as you move you get big ugly motion-blur-like trails. So what we need to do is try and fix the case where it moves.
I split “movement” into two cases: object movement and camera movement. Camera movement is where temporal reprojection comes into play. How this works is, when we’re blending the current frame onto the previous frame we don’t just use the same pixel in the previous frame. Instead we project the current frame’s pixel back into the previous frame’s camera space by using a combination of the inverse view projection for the current frame and the view projection from the previous frame – which also requires the pixel depth, which is fortunately kicking around in a GBuffer – then sample the pixel there and blend it. This is basically trying to track positions in world space as they move in screen space. It does indeed fix most of the camera movement artefacts. Of course, problems do occur – at the edge of the screen, or where pixels that were occluded become unoccluded and vice versa. To cancel those, I weight the alpha of the blend by the world-space distance between the previous and last frame pixels. What it’s trying to work out is “is it really the same pixel”, and if it isn’t, don’t try and blend it – just overwrite it. Conveniently that can be used to fix object motions too. Finally use an edge detect mask on the whole thing so only the edges get blended.
Here’s some images to compare (off and on):
Well, it works! It actually works pretty nicely. The thing about temporal techniques is that they settle over time – so when you get a relatively static screen it quickly convolves to an antialiased image, becoming more aliased as movement is introduced. For a situation where you didn’t have too much movement on screen it’s a good technique. The problem is, for Frameranger we had some very fast camera movements – it just wasn’t working well enough.
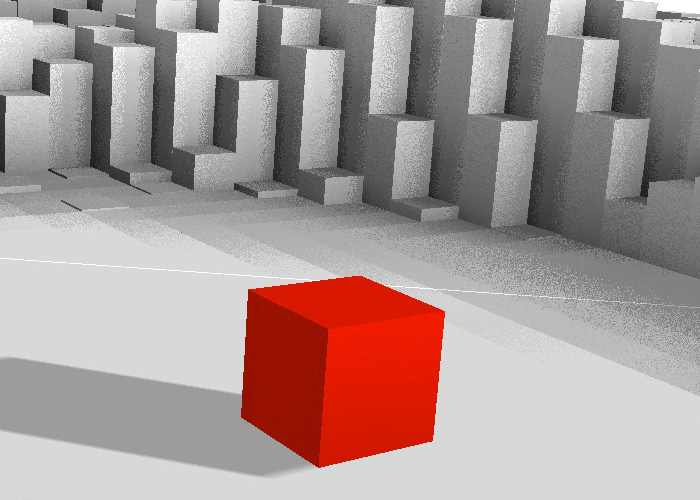
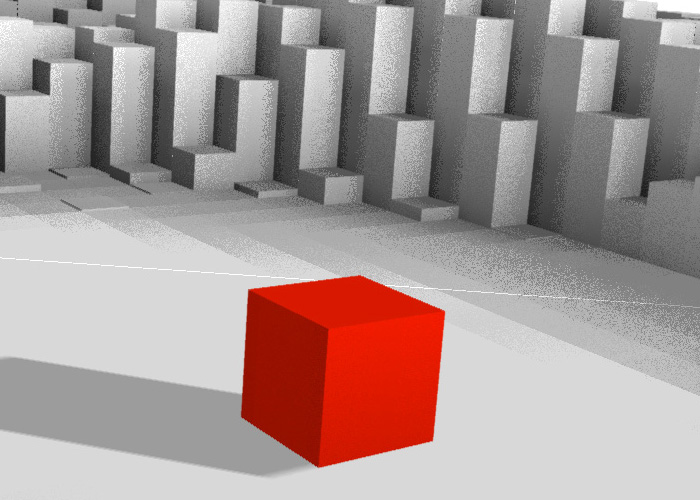
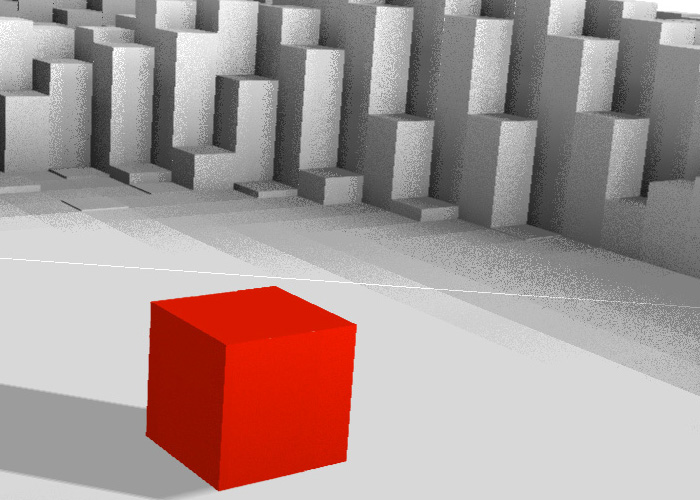
Here’s some shots showing how it looks when the red cube is in motion (off and on again) – and with a small camera motion too. As you can see, some aliasing does creep back in.

Finally, over time, I came up with an actual real solution to deferred rendering with antialiasing. Unfortunately it requires an additional geometry pass, but it gives you the look of proper MSAA. The idea is to render the GBuffers, lighting passes and so on to a non-MSAA buffer, then re-render the geometry to an MSAA buffer, which a shader that just samples the buffer containing the lighting results using a bilateral filter based on depth. Then resolve that MSAA buffer to give you an antialiased result. This is in a way quite similar to a light prepass using inferred lighting, but the MSAA pass only samples the lighting results buffer – it doesn’t need to compute any shading of it’s own.
We know that the reason MSAA is efficient is it only runs the pixel shader once per pixel, but generates a depth/stencil value for each sample in the pixel – so depth test+write is performed multiple times. This means that for primitive interiors with no intersections, the value of the pixel will be the same as for the non-MSAA buffer – only the edges of primitives and the intersections between primitives will have different values. This technique exploits this. We generate the depth values for MSAA by re-rendering the primitives; we just need to work out what colour to write for each pixel on each primitive. On edge pixels for a non-MSAA buffer, the final pixel value will be that of the front-most primitive. On edge pixels for a resolved MSAA buffer, the pixel value will be an average of the MSAA sample values – the value of the front-most primitive per sample. This technique estimates the value per primitive to write by using the bilateral filter to look around a small area around the pixel in the same screen location as the one it’s currently shading on the non-MSAA buffer, and asking “which of these probably came from the primitive I’m rendering, and is therefore a good estimate”. Or in practice a weighted average of the pixels in the area, weighted by the difference between the non-MSAA depth and the primitive’s pixel depth.
Bilateral upsampling is an extremely useful technique for fixing up edges. It’s also a very good way to upsample lower resolution soft particle buffers, for example. I’m pretty happy with this method, and it’s what we’re now using for the much improved Frameranger final version (due out soon!). It’s made a lot of difference to the quality and cleanness of the look, with a pretty acceptable overhead. It scales to 4x, 8x or more MSAA samples nicely and only impacts the cost for that one pass, which has a reasonably simple shader and output bandwidth requirement (compared to the GBuffer stages or the deferred lighting passes). It actually has some similarities to Inferred Lighting, although my method is just for antialasing and not for shading.

Now, if you happen to be on a more flexible API or piece of hardware than me where you can read samples from MSAA buffers – like a PS3 – there’s an optimisation / extension to this – you can use the same technique but avoid the re-render. It goes like this: render the GBuffers to MSAA targets; resolve the buffers using a point sampling scheme – e.g. “pick top left sample”; run the lighting processes on these resolved buffers; now perform an additional fullscreen pass:, read in your original MSAA Gbuffers, then for each MSAA sample from that buffer – perform a bilateral filter w.r.t depth/normal, sampling from the resolved GBuffers and light buffer, to weight the resolved light buffer samples for that MSAA sample from the GBuffer. That will give you a bilateral upsampled light result per MSAA sample of the Gbuffer, and you can average them in the shader and write out one final antialiased light value. Clearly you only need to run these shaders on edges if you wish to optimise it further. So there you go – a practical solution to deferred rendered antialiasing which only needs one geometry rendering pass, and lets you perform lighting on a single-sample screen-sized buffer without worrying about MSAA at that stage. Shame it doesn’t work on DX9, because then for me it would be the ideal solution.
Coming up in part 2 : ambient occlusion.
