direct to video

September 30, 2009

frameranger.

Filed under: demoscene — Tags: , , , , , , , — directtovideo @ 1:45 pm

frameranger by fairlight,cncd,orange
capped.tv

2008 rolled around, and it was time for us to get over the disappointment of Media Error’s poor public reception and try and do something, again, to try and win the Assembly demo competition – the thing that still eluded us after all these years. The major criticism of Media Error had been its flow – some people thought it was a series of unconnected scenes. To me the theme was obvious (obvious!!) – a TV flicking channels, and a thing about war – but apparently it was too vague for the average viewer, who needs to have his hand held from a to b. Apparently a demo only has “flow” nowadays if it either a) consists of one single scene, or b) is so covered in noise that it’s hard to argue what the viewer is seeing and therefore say if there is any flow or not. Making a demo with actual discrete scenes and a variety of content is apparently a complete no-no nowadays. But that’s another post entirely.

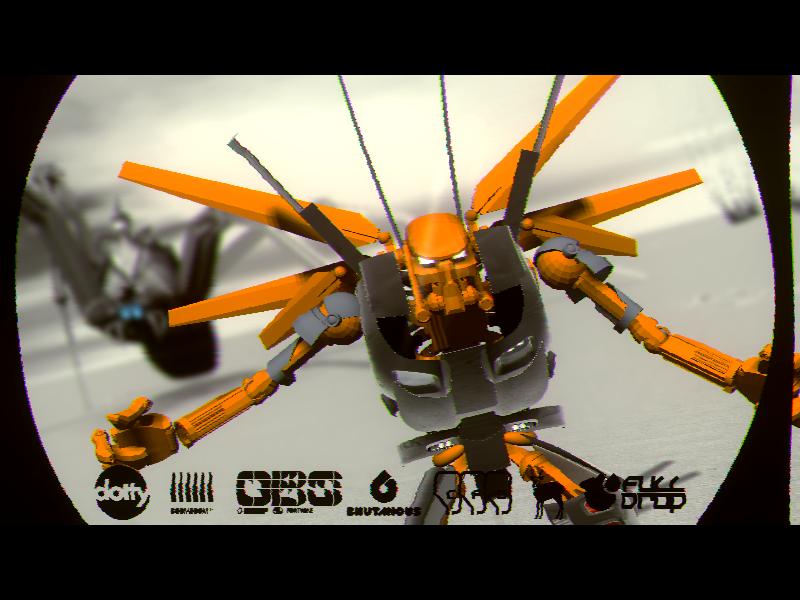
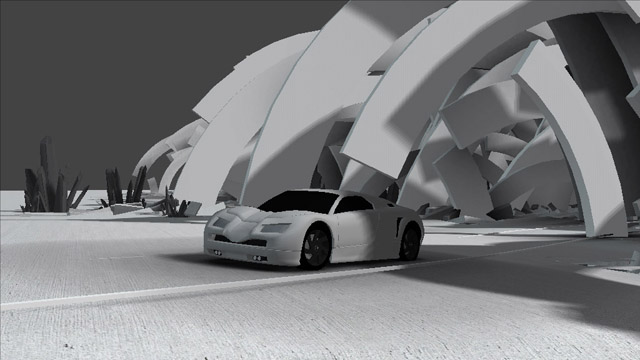
Anyway, we decided we did want to do something with a more clear storyline. The rough concept we settled upon was a “story” about a robot (car) coming to earth in a space ship, landing in an explosion of debris, driving to a city, battling a large spider robot and then transforming into humanoid form and finishing the job. Yes, it’s an 11 year old comic book/sci-fi nerd’s wet dream. But seeing as we’re “cool”, the clever part is it was all to be done with style, clever art direction and graphic design. Think the art house version of Transformers.

The second thing we wanted was a “demo part” – something seemingly unconnected to the main story where we throw in a load of big heavy effects to say “hah, we’re better than you”, in classic demo tradition – a homage to the demos of the early 90s, where a “design part” / graphics-heavy story section would give way to a series of vector effects which showed off how massive the coder’s balls are. That’s another problem with the demo-watching audience these days – sadly the average technical knowledge has dropped off quite heavily, so often the audience doesn’t realise if there’s an “effect” or some clever code at work unless there’s a massive red arrow pointing to it saying “clever effect here”, or if the effects are presented in such a way that it’s bleeding obvious that there’s a big effect there. Well, we’re “cool” so we don’t do that usually – we like it when the effects are seamlessly mixed into graphics and design, so you can’t tell exactly what’s going on – but it does lead to people missing the clever stuff. We decided to rectify that with the “demo part”.

It became apparent this demo was a pretty tall order. The scenes were massive and numerous; the animation requirements far exceeded previous productions; and the story / direction meant that it was a lot harder to chop and change – in most demos if you lose a scene you can fill it with something else, but if there’s a story to follow and you lose a scene the story stops making sense.

Assembly 2008 came around. Unfortunately I was busy fixing two other entries – a 4k and a 64k (Panic Room, which won the 64k competition) – so I didn’t devote as much time to the demo as was needed. In the end we all ended up, as has become tradition, in Destop’s apartment on the thursday night of Assembly. One small issue was that I had previously visited the party place on the way to the airport to drop off some friends, and I happened to stop by the Assembly sub-event “Boozembly”. Assembly is an event attended by kids of all ages, unfortunately including those under 18 – and the insurance and licensing difficulties mean that they have to make it completely dry – no alcohol is sold, or even permitted in the hall, something strictly enforced by the numerous security guards. In fact they even sometimes check your car for alcohol if you park in their car park. Fun and games ensue every year as people try and find ways to get alcohol inside – something I’ve managed just once, but that’s another story.

To make up for the lack of booze inside there is an unofficial sub-event that occurs on some rocks a few hundred metres away from the hall called “Boozembly”, which is usually a complete mess of drunks wandering around in the darkness falling over (and off) sharp rocks. I remember one year – I think it was 2003 – two members of Noice had ambulances called within hours of each other for different reasons. Anyway, I had visited the rocks while going to the party hall and had a few beers before heading to Destop’s – so by the time I got there it was very late, and I wasn’t going to be too productive.. the next morning we decided to make the sensible decision and give up. For once we felt the content was too good to waste on a rushed demo.

We set numerous deadlines for release. The first one that went by was NVScene a few weeks after Assembly; later we tried for Breakpoint at easter 2009. All came and went, and Assembly came around again. This time there was a sense we really had to make it. We cleared our schedules and dedicated some proper time for it. For the first time in years I wasn’t able to attend Assembly, so for once that weekend of crunch in Helsinki wasn’t going to happen – it had to get made properly on time. For once we actually planned it out. We had time – a couple of months. We had a lot of content and assets already done, a stable toolset, and we knew exactly what we needed to do.

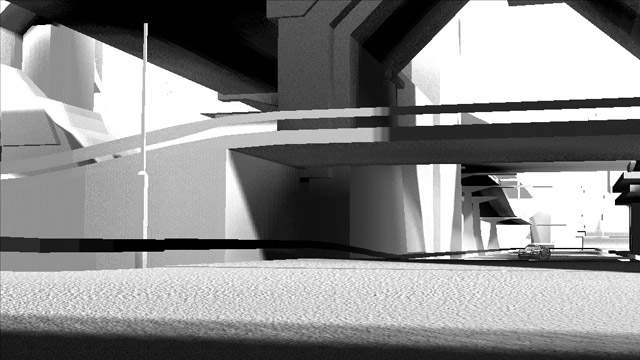
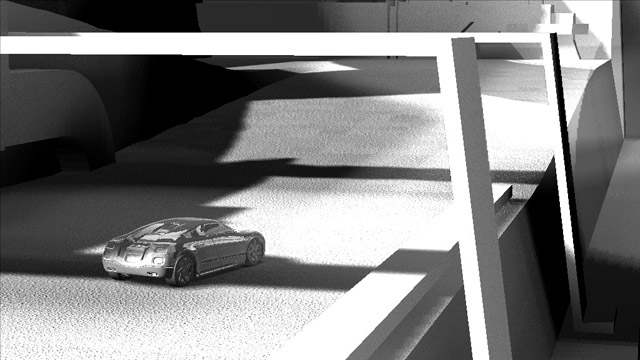
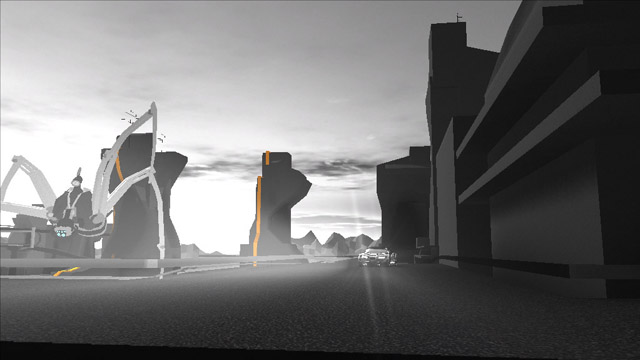
For this demo we tried a different approach to actually making it. For previous demos I’ve worked on, they usually followed a certain pattern. We made some graphics or effects; we set them up in the demo tool, and spent an age tweaking the lighting, shaders and layering on the post fx; and it remained like that until just before the deadline, when we quickly jammed in some cameras and animation in the scene and called it “done”. What that gave us was a load of pretty but boring scenes. Or worse, a lot of work is done on content that never gets seen by the demo camera. This time we wanted it to be different. We decided to focus on the weakest thing in our demos – the “action” – and get that done first. Post fx, lighting and shading are important, but ultimately a distraction – you can spend hours tweaking colours. It’s the easiest form of procrastination. We went for an approach that some gamedev teams use and tried to build the demo “in grey” – almost unshaded, no post fx, simple lighting and placeholders where necessary, to get the cameras and action right first. I actually believe this did work, and it’s a good way to go – it made us concentrate on getting some nice motions and direction down early, and we knew where the camera was going to be before we set up the lights, post fx and shading.

work in progress shot of the city.

The challenge was still immense. We hit a lot of problems – technical, artistic and logistic. The number and size of scenes meant that our previous approach of baking lightmaps for ambient occlusion / global illumination wasn’t feasible – it would send us way over the 64mb limit – so I came up with a new lighting engine that ran fully deferred, and allowed us to use a number of techniques to approximate ambient occlusion in realtime. The old engine wasn’t set up for such a large amount of animation content and had to go through numerous optimisation passes just to make the thing load in a sensible amount of time. Some of the effects and the rendering engine were very heavy on render targets, so we had serious problems with lack of VRAM. We had major main memory problems too – we had never made such a large demo, and we found that we were hitting the 2gb win32 app limit in the demo tool, causing it to crash. I had to spend yet more time optimising the memory usage. I later discovered the major culprit was TinyXML – it ate 600mb to load a 30mb XML file (our demo “script” – which is generated and superbloated), and completely fragmented the memory with small allocations. My emergency fix was to optimise the XML file itself – yes, cutting down by hand the names of nodes and attributes – and got it down by more than 50%, which got us out of trouble until I rewrote the XML loader after Assembly.

One of the biggest headaches was the music. Fairlight (/CNCD/Orange), unlike many other demogroups, does not have one active musician who does all our soundtracks. We have a few musicians we work with but most have moved away from the scene onto other things – some went pro, some just got out entirely. In some ways it’s good because we are able to look around and find the right sound for each project, not be tied to what one guy can do, and we’ve had some really great soundtracks over the years by the likes of Northbound Sound, Little Bitchard, Ercola, Sumo Lounge and others. The problem is we’ve got no one person in the group who takes responsibility for it. I don’t think it’s an understatement to say this demo has been through the most difficult musical journey of any demo I’ve worked on. Over the year – 18 months it’s been an active project, we’ve had at least five musicians involved, and many tracks. It seems that the more brilliant the musician the harder they are to lock down – they always have other projects on the go and don’t have the time to dedicate to this. With a few weeks to go until Assembly we finally got Ercola (responsible for the Media Error soundtrack and a great producer and artist) involved. He was a guy we knew could turn it around very quickly and do a good job, which is exactly what we needed. Even so it was seriously nerve-wracking up until the last week before Assembly when we finally got the track. By the way, if anyone out there is a great musician give us a call, we are always looking for good musical input. 🙂

Frameranger contains a lot of graphics and a lot of code. There is a whole collection of effects and rendering techniques, some of which will get a blog post on their own. I decided to go for completely deferred rendering and it worked out great. As well as being able to use as many lights as we wanted it greatly reduced the number of shaders being generated by the ubershader (a major issue on Panic Room). I added the ability to combine multiple (dynamic) environment maps like lights in the deferred render, and support for secondary rays cast off the deferred buffers for ambient occlusion. In fact almost everything in the demo has ambient occlusion, generated one way or another in realtime through various techniques. One of the best things was being able to combine traditional polygon geometry and raytraced effects seamlessly – e.g. we raytraced the liquid effects straight into the deferred buffers and sent them through the same lighting pipeline as everything else, casting and receiving shadows etc.

early work-in-progress shot of the lighting and ambient occlusion passes in the city.

Raytracing / ray marching popped up in numerous places. We used volumetric lights for the car headlights which were ray marched through the shadow map in screen space as a post effect. The surfaces for the fluids were raytraced on GPU too, using a technique I invented to handle almost unlimited numbers of metaballs (up to around 100,000). Of course there were other effects at work too – many post effects, particles, breaking floors and so on. However, most of them were mixed into the design and graphics so they were almost hidden away – it’s the kind of thing where you only notice them when they’re gone.

work in progress shot of the car headlights.

Fortunately we had the antidote to that – the “demo part”. My new fluid solver / renderer was ready at last for that. I had written a new 3D solver for fluids running on the GPU which used a new technique to get higher resolution and better performance: I evaluated the velocities at lower resolution – and even then the grids were still much larger than in Media Error thanks to modern GPU performance. Then I used the velocity grid to drive a procedural fluid flow solver to approximate the look of fluid eddies and mixed that with the velocity grid. Then I applied that to a high res density grid to push it around. The results were superb. The procedural flows weren’t tied to the grid resolution so they could produce really sharp results which didn’t lose detail. The velocity grid just had to handle the overall rough motion.

Then we had to do something interesting with it. In the end we used it for two effects – a liquid renderer driving particles and an isosurface which was raytraced, and a smoke renderer. Both had a full lighting and shadowing pipeline – giving us superb results. For both effects we were able to use voxelised meshes as the source input. We tried a few things for the smoke but in the end we used the effect to destroy some credits text. Unfortunately it was a prime example of artistic vs technical compromise, of which there is a lot in the demo. The scene didn’t show off the power of the effect to the fullest – it didn’t show all the clever features of the effect – but it looked really nice visually, with puffs of coloured smoke. Of course such things are completely lost on the audience. One genius commentor on pouet said about the scene, “nice plasma”. Nice plasma! It makes you glad you bothered with weeks or even months of work trying to innovate in the realm of realtime fluid dynamics, when your results are compared to an ancient demo effect.

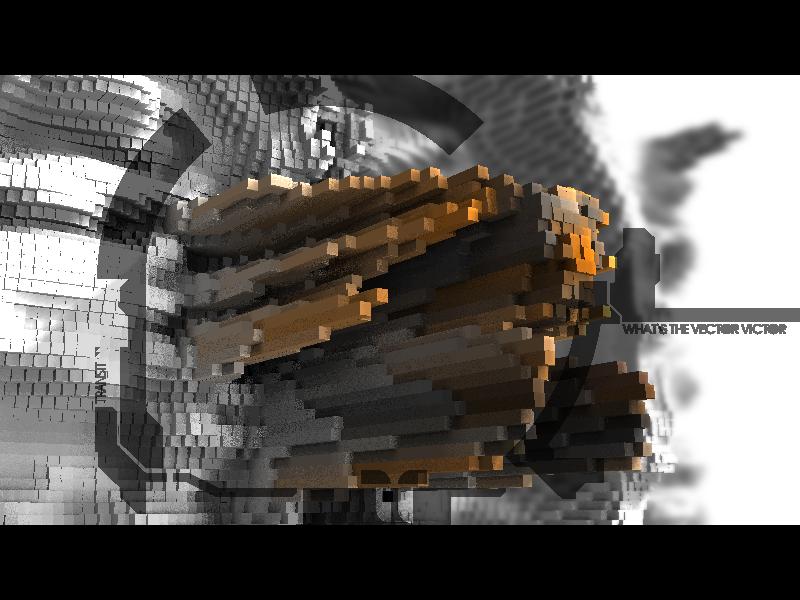
One scene that worked out surprisingly well was the “pixel blocks” sequence. It was a simple effect – a grid of cubes, animated by rendering something to texture and using it as a heightfield – made “cool” by the use of raytraced heightfield-based realtime ambient occlusion which gave it the nice shading it had. Surprisingly it ended up as one of the most popular scenes in the demo, yet it was by far the easiest and took about an hour of work to put together on the saturday morning of the deadline.

the heightfield effect

A special word has to go to the work Destop did on the graphics and direction for the demo. He built most of the demo in our demo tool. The battle scene had around 40 cameras and a massive amount of carefully placed animations, and the whole scene contains 1000s of nodes where most scenes contain 10 to 100 – it’s by far the biggest thing I’ve ever seen made with the demo tool. It frightened me a bit actually. We also had Der Piipo doing a lot of modelling and animation work, and Mazor showed up with the 2D hud gfx at the end – just in time to fill some gaps.

Sadly, the demo still had problems. We knew the battle scene was the crux of the demo – make or break – and it was the biggest and hardest scene to do. A long action sequence – part built in Lightwave, part in the demo tool – with a lot of explosions and smoke. It was the smoke that caused me a huge headache. I went over and over this trying different solutions and none of them worked well. The requirements were: it had to fill a lot of space, with multiple explosions around the environment at once; it had to persist, so it didn’t fade out visibly; it had to fit with the meshes and lighting; it should look a bit stylised – not super realistic, but still cool and smoke-like; and the frame budget wasn’t massive for it as the 3D was already eating a lot of power. Those requirements meant I had to rule out something really cool like proper fluid dynamics – the scene was too big for grid-based effects. We could only handle a certain number of particles in the frame rate, and the lighting and shading would have to be faked. I tried various techniques and wrote the effect a few times, and it never quite worked out – so I kept putting it off. In the end I rushed something out in a couple of days and the solution wasn’t satisfactory – a hand-coded particle effect that could be spawned around the environment as needed. I didn’t like the end result much at all. That was one thing that went to the top of the list for the final.

We had other problems too. In the end, even the best laid plans break down as the deadline nears. I wasn’t travelling to Helsinki and I had to go to a wedding on the saturday morning, so that ruled out real last minute crunches – but somehow we ended up doing that anyway. For the last week before Assembly I got up at 6am and went to work every day, working on the demo on the train and at lunchtime whenever time allowed, and then came home and worked on it through the evening and half the night too. Then I got up the next morning and did it all again. The problem with demo crunches is that unlike work crunches, there’s much less external pressure to do it. For work you know you don’t really have a choice. For a demo you always have at the back of your mind, “I could ditch this right now and it wouldn’t matter”. When you’re exhausted and stressed out in the middle of the night you keep going because you don’t want to give up, you want to get it done and you don’t want to let your team mates (who are also up in the middle of the night working with you) down.

Come the thursday night we still had a lot to do. I took the day off work on friday and worked on it solidly, with 3-4 hours sleep on thursday night and less on friday. We missed the deadline on friday night but after a night and morning of work, come saturday lunch time it was done. All that was left was to hand it in, get refreshed, shower, and drive to the wedding – where I think I looked like a zombie. Then, come the evening, the competition started far away in a hockey stadium in Helsinki. The wedding was in the middle of nowhere so mobile phone reception was poor to non-existant but I managed to go outside into the car park and get a bar – when I finally got the news I had been waiting for by SMS, first from my groupmate and then from a load of other friends who had been watching the competition, either at the party or at home watching the live stream. “What happened?” I asked. The reply came back – “finally we’re going to get the trophy 🙂 “. “Is it close or did we destroy the competition?”, I asked. “Destroy :)” came the answer. I went back inside and enjoyed the rest of the wedding with a grin on my face. It seemed like we had finally done it.

September 29, 2009

the wonderful world of 64k intros.

Filed under: demoscene — Tags: , , , — directtovideo @ 1:58 pm

Optimising for size has been part of the demoscene for as long as anyone can remember. It probably started off driven by the desire to fit something interesting into a boot loader or something like that. 64k intros involve fitting a whole production – music and graphics and code included – in one self-contained executable of 65536 bytes. That’s not much bigger than an empty word document; it’s likely that one screenshot from the production in JPEG form would be larger than the 64k taken by the production. The nice thing about 64ks is that it’s enough space to do something worthwhile in terms of design, sound and graphics – but it’s small enough to still amaze people with the file size aspect. 64k is enough space to work in a “usual” fashion. To be able to work on graphics and music in a proper environment, and to be able to code without having to think about every byte – something that makes smaller productions (e.g. 4k or less) painful to produce.

The category evolved through the 90s, pushed forward by groups like TBL who managed to fit decent visuals and soundtracks that sounded like “proper music”. It reached a head with the release of fr-08: .the .product in 2000, which contained an amazing amount of graphics which actually looked something like you might see in a typical PC videogame of the time – but in a tiny fraction of the space. It set the world alight and immortalised the creators, and everyone wondered – how was it done?

the product by farbrausch, 64k in 2000

The answer was: they generated it. The textures, models, soundtrack – all generated, based on metadata about how to create the elements supplied by the artist using their custom-produced graphical tool set. In simple terms, they dont store the pixels for the texture in a compressed form; they store the steps to tell the engine how to regenerate the texture, from a combination of simple generators like noise, and blending operations. Of course, this kind of thing had been around for years, but this was the best implementation so far. The clever thing about these guys was that not only did they make such a great production, they also told the world how they did it. Numerous presentations and articles were followed up by releases of most, if not all, the tools they used in the making of the production for the world to see.

werkzeug by .theproduct - tool for making 64k intros

Something about it all caught the imagination of many of the young coders around in the demoscene at the time, myself included. Maybe it was the idea that the coder was back in charge and taking centre stage after years of being edged out by the artists and musicians; maybe it was the challenge of doing something bigger and better than these guys had done; or maybe it was about wanting a piece of the substantial fame they had achieved in the community and beyond. It’s worth noting that most good demos get a few thousand downloads; some of the stuff these guys made got hundreds of thousands. It went way beyond “the demoscene”.

So, like so many other coders, I started working on 64ks myself. The road was long. With 64ks nothing comes easy. You are expected to make content that would look decent in a 64mb demo, but there are no shortcuts. In a demo you can get graphics from anywhere – a 3d tool, your camera, the internet; and you can make the soundtrack however you want as long as it ends up as an MP3. In a 64k you wouldn’t get very far like that – you have to have a hand in the whole creation process yourself. If you want tools to make graphics and music, you have to go and make them. It massively increases the time taken to make anything.

My 64ks through the years

From 2001 to 2006 I made quite a lot of 64ks. They started out pretty awful – badly made hardcoded affairs – but grew into some quite hefty productions, winning Assembly and Breakpoint 64k competitions and gaining a scene.org award for best 64k intro and numerous nominations. I developed my own modelling, texturing, animation and scene editing tools, and my own soft synth (VST). It was an exciting time to be involved. There was an arms race between several groups – at first Farbrausch and Conspiracy, later Conspiracy and us (Fairlight). Every year we’d all be sat in the party hall at Breakpoint or Assembly trying to hammer out our production, each wondering what new tricks the other group had managed to pull off and whether it was better than the new tricks we had managed to pull off.

My final 64k was “dead ringer”, released at Assembly 2006, where it took first place. Dead ringer was a breakthrough in that it was the first 64k intro to move away from large and impressive but static scenes with simple animation – and featured a fully animated character performing a series of breakdancing moves that started life as several mb of motion capture data but managed to get squeezed into around 6k. Assembly 2006 had the most amazing 64k competition ever seen – the three big players in 64k (us, Conspiracy and Farbrausch) and Kewlers all competing, the bar getting pushed higher each time. It seemed that after that competition, the 64k scene was never the same again. Perhaps the bar had been pushed too high, and the amount of work needed to move it on was just too much for anyone to contemplate.

After Dead Ringer we were pretty much spent, so we quit. That was the plan, anyway. As it happens we came back in 2008 and made another 64k, “panic room”, which won the 64k intro competition at Assembly 2008, but that’s another story.

It took me a long time to realise the real secret of the farbrausch 64k intros all those years ago: all the talk is about the technology, but really it’s all about the artist. That’s the difference between a few numbers plugged into a generator routine, and those wonderful scenes that looked “almost as good as a video game but in 64k”. Sadly it’s the thing so many coders forget. It doesn’t matter what routines you code or what tools you build – in the end what matters is how they get used.

fluid dynamics #1: introduction, and the smokebox

Filed under: demoscene, fluid dynamics — Tags: , , , , , , , — directtovideo @ 10:57 am

One effect I was asked for a lot for demos by artists was “fluids”. Fluid dynamics make for great visuals – they look complicated, with minute details, yet they make sense to the human eye on a larger scale thanks to their physical basis. Unfortunately they are rather difficult to do. But if it were easy it wouldn’t be fun, right? Fluid dynamics and rendering has become an area of research I’ve kept coming back to over the years, and my journey started at the end of 2006. I immediately discounted simple fakes and decided to try and do something pretty “real” for our demos in 2007.

The first problem is that fluids take some serious computation power to calculate. To do it “properly”, what you have to do is simulate the flow of velocities and densities through space using a set of equations – “Navier Stokes”. I’m no mathematician, but fortunately these equations don’t look half as nasty in code as they do on paper. The rough point of them is that the velocites/densities at a certain point are interacted with other points nearby in space in the right way.

The basic approach follows two paths, depending on how you want to model space – you can use particles (SPH), or a grid. Grids are bounded in the area they cover, and their memory requirements depend on their size, but the equations are simpler and tend to be faster to solve – with grids, you automatically know what points are nearby. densities/velocities tend to dissipate and you lose details. Their rendering suits gas-like fluids well, as it’s typically visualised using a ray march through the volume – which suits transparent media. Particles can suit liquids better, and are unbounded – they can go where ever they want – and you don’t lose details in the same way as grids. You need a lot of particles, and the equations are a bit uglier and slower to solve because you have to work out which particles are near each other particle – it actually has a lot of similarities with flocking behaviours. Rendering particle fluids usually involves some sort of implicit surface formed from the particles and visualised using a raytracer or polygonised with marching cubes.

Modern offline fluid solvers tend to support one or both methods of fluid calculation. Fluids are big business – movies, adverts, all sorts of media use them. Offline renderers support hundreds of thousands of particles or huge grids, and can take hours to compute a few seconds of animation. So it’s going to be hard to compete with realtime.

I started off with grid solvers. They’re easier to understand and there are good examples and tutorials/papers out there that explain how to do it – and they aren’t packed full of magic numbers. The navier stokes equation breaks down into the following steps:
Update velocity grid:
– take the previous frame’s velocity grid
– perform a diffusion step – a bit like a blur
– perform a projection step – makes it mass-conserving, and its what gives the effect that swirly quality. In reality that means a linear solver with 10-20 steps, meaning looping over the whole grid 10-20 times. It’s the slow bit.
– perform an advect step, which is like doing “position = position + velocity” in reverse – to pull the velocities from the previous frame’s grid into the new grid.
Update density/colour grid:
– perform a diffusion step
– advect using the velocity grid.
You’ll soon realise you can cut out the diffusion steps – you can lose them without hurting the final result.

The first attempt I made was to do a 2D grid solver. That’s pretty easy – there’s a good example released by Jos Stam (probably the “father” of realtime fluid dynamics) some years ago which is easy to follow, although it needs optimising. The nice thing about 2D grid fluids is that they map very simply to the GPU – even back in the days of shaders 2.0. The grid goes into a 2D texture, and the algorithm becomes a multi-pass process on that texture. That worked out great – a few days of work and it was usable in a demo. It made it into halfsome in 2007. The resolution was good – we could have one fluid solver running at 512×512 well, or several at 256×256 – which proved to be ample. It was quite easy to control, too – we could simply initialise the density grid with an image, the velocity grid with random blobs, and the image was pushed around by the fluid.

2D fluids are nice, but 3D is better. But 3D brings a whole new set of problems. It was quite easy to extend a 2D solver to 3D on both CPU and GPU. Sadly at the time and on DirectX9, GPUs could not render to volume textures – so the problem could not be extended simply by changing the texture from 2D to 3D. Instead I had to lay out the “volume” as a series of slices on a 2D texture. That was hard to get right, but apart from that it extended easily. The problem was it was rather slow. The GPU at the time (GF6800 was the card du jour) just didn’t have the performance to handle it, when the extra overhead from fixing up and sampling from the 2D slice texture came into account. So the next option was to go CPU – I spent quite a long time hand optimising the code in SSE2 intrinsics, and then wrote out a volume texture in the end for rendering. Unfortunately the algorithm is in parts heavily memory/cache limited – the advect stage in the equation jumps around in memory almost randomly. In fact, in some parts of the solver the GPU was far faster thanks to more efficient memory access, and in other parts the CPU won out thanks to raw calculation performance and being able to re-use previous cell values. (Note, this is back in 2006-2007, Core Duo vs a GF6800.)

Finally I had a solver. Now, how to render the results? Raymarching the “volume texture” was quite slow – rendering the slices as a series of quads worked out better. Now the fun stuff started. I realised the key to a good looking was lighting – and for a semi-transparent thing like smoke/gas, that means shadows with absorbtion along the shadow ray. Ray marching in the shader or on CPU was out of the question, but fortunately there was an easy fake – assume a light that was only from the top down and do a “ray march” which added the value of the current grid cell to a rolling sum, and wrote the current sum back to the grid cell as a shadow value, then moved to the next cell immediately below it. That could be made even easier on my CPU solver by flipping the grid around so that the Y axis of the fluid was the “x axis” of the grid – and the sum could be rolled into the output stage of the copy to volume texture – so the whole shadow “ray march” was almost completely free.

After some time experimenting I discovered that the largest grid resolution I could get away with performance-wise was 64x32x32. Unfortunately it looks pretty rough at that. I tried a few things with octrees to avoid empty space but it just didn’t work – with my small grid, the whole space got filled quickly. In the end I simply doubled the res of the density grid and interpolated the velocities – so the slow part of the equation, updating the velocities, ran on a grid with 1/8 the number of cells as the density grid – which is the one where you really notice the blockiness.

It worked. It ran at framerates of at least 30fps realtime, with a grid res of 128x64x64 for the densities and 64x32x32 for the velocities. At the time of release it was probably the fastest and most powerful CPU grid solver ever made. It was even compared to the nvidia 8800 demo – which was running at a significantly higher resolution, but on vastly superior hardware and without lighting. We used it in media error, although we were so rushed with the demo that it only got used in a rather boring way – as “smoke in a box”. And it made me want to do something bigger and better.

smokebox in media error

old demos #2: media error (and track one).

Filed under: demoscene — Tags: , , — directtovideo @ 8:43 am

Our entry to the demo competition at Assembly 07, placed 3rd.

media error by fairlight cncd orange
pouet
youtube
capped.tv
download

In 2006 we made track one for Assembly 2006, and placed 2nd in the demo competition. We did quite well out of it, later picking up the scene.org award for the best demo of 2006. So we decided to do it again, and try and go one better and win Assembly.

Winning the Assembly demo competition is pretty much the demoscene equivalent of winning the world cup. The event has been around for over 15 years, and a lot of people interested in the demoscene today grew up marvelling at the demos released there back in the day. It’s a massive event today, with over 4000 visitors – most of whom are gamers, but it still has a strong scene pedigree. The combination of the size and exposure of the event and the historical significance makes it the one we always wanted to win.

Track one was probably one of the most intense creation processes I’ve ever been involved in. We only really decided to make something a few days before Assembly 06 started. This was partly my fault as I was off making glitterati and dead ringer, eating up a lot of my time before the event. We – a team of programmers and 2d+3d artists – spent three days of the four day event holed up in Destop’s apartment in Helsinki, only sleeping a maximum of 4-5 hours the whole time. It was insane and completely exhausting but still an amazing experience – everybody throwing out quality work, making new effects and graphics, running over to someone else’s pc to see the latest big addition. Thankfully the artists had quite a few pieces lying around on their hard disks that we could use.

Of course it was also utterly shambolic. Not only were we not sleeping, we were drinking more or less continuously. Of course we missed the deadline. Then we missed the “real” deadline – the usual cutoff point – and then we were rushing to hit the “absolutely final” deadline – when they record the entries to video. Usually in a demo competition one can push the deadlines right up until the minute they start the competition – and indeed, my current record is submitting a demo at breakpoint while the 8th entry in the competition was actually playing on the big screen. At Assembly they prerecord the entries to video so you don’t have that luxury. Well, we made it – but there were some compromises, like the last minute or two of the demo being just whatever we had to throw in. Someone (we never found out who) moved a load of the timeline bars during the last night and made it all out of sync, and we never quite fixed it all. By the end we had made it but we were totally exhausted and vowed not to do it like that again.

Track One by Fairlight
track one on pouet
youtube
capped.tv

The making of media error was supposed to be a carefully planned affair, starting early and finishing on time. Of course it wasn’t. Firstly we decided – at artist request – early in 2007 to completely remake the engine, adding a node graph to our current demo tool which largely resembled the AfterEffects timeline at that time. Then we fully integrated Lightwave support – the artist’s tool of choice – with a full loader for objects and scenes. This was all good, but the tools were quite fragile as a result. Then we foolishly got dragged into the Intel Demo Competition 2007, and by the time we were done we had less than four weeks to make a demo for Assembly 07.

Still, we had managed to assemble a superb team – and we felt we could pull it off. Sadly we ended up exactly where we were in 2006, with a bunch of us piled into Destop’s apartment in Helsinki working all hours on a demo. Again, we missed the deadline by an epic amount. Again it was a crazy but amazing process of not sleeping, drinking too much and spitting out graphics and effects left and right. We made it a bit earlier than track one, and felt pretty good about the demo.

Unfortunately in the competition we came up against one of the biggest demos ever made – Lifeforce by ASD – and fell to 3rd place. Winning Assembly would have to wait.

September 25, 2009

old demos #1: tactical battle loop.

Filed under: demoscene — Tags: , , — directtovideo @ 2:54 pm

I’m a bit late to the blogging party. Which means I’ve got a whole plethora of old things to write about that I would have written about at the time, but I didn’t have a blog. So here goes.

We did this demo back in 2006 for the first Intel Demo Trailer competition. How that came about was, they called me up and said “we’ll give you a laptop just for entering and 5 more if you win – and it only has to be 30 seconds long”. Hard to refuse – pretty good return for a 30 second piece. So we did it.
tactical battle loop by fairlight
youtube
pouet

We had recently come 2nd at Assembly 2006 with the demo “Track One”, and I decided to use much the same technology, tools and the same team as for that one. Why change a winning formula. Unfortunately the artists had other ideas and demanded that we had a full import pipeline from Lightwave 3D – whereas Track One was built using an import pipeline from 3DS Max, .x, .obj and pretty much any way we had of getting 3D into the engine. Strange that they didn’t like it.
Most of the demo was built by Destop/CNCD in Lightwave and using our demo tool. Extra effects were then coded up and shoved in in the demo tool.

The small catch was that one of the rules was that we had to use music provided by DJ Hell as a basis, although we could remix it. What they didn’t tell us was that the tracks we could choose from were stupidly bad, so our remix ended up almost unrecognisable. Hell wasn’t too happy about that apparently.

The good thing was, we won. So we got the laptops, but we also got something better – Intel flew us all out to Munich for a party. Free bars, paid hotel, the works. So much fun that we also entered 2007 and 2008‘s competitions, but they didnt work out quite as well.

demoscene.

Filed under: demoscene — directtovideo @ 2:32 pm

Some people collect stamps; some mow down old ladies with mopeds. My hobby for the past 15 years or more has been the demoscene.

I can claim that my interest in it has got me at least one job, a modicum of fame in the world of computer geeks, friends and trips all over the world (mainly northern europe), earned me a couple of cable TV appearances watched by at least five people, won me a few awards and a small amount of money, cost me a fair amount of money, cost me even more in terms of lost sleep, stress, liver damage and at least one near-hospitalisation.

These days I’m a programmer in Fairlight – a group that’s become a true piece of computing history, and is only a few years younger than I am (although I didn’t join until I was 19).

Demos used to be a pretty casual affair, hacked together by kids trying to show off to other kids how clever they could be with their computers. But over the years it got serious. The afforementioned kids grew up into highly skilled professionals, many of whom become prominent members of the games industry amongst other things.

Making demos got a lot more complicated too. Nowadays our demos are made by professional artists and programmers in custom-made realtime editing tools. The motivation never really changed – kids showing off to other kids – but the results are a mile away from the early days.

welcome.

Filed under: Uncategorized — directtovideo @ 2:16 pm

I have finally caved in to peer pressure and started a blog. I could come to regret this.

Create a free website or blog at WordPress.com.